Manage smart builds (beta versions)
Overview
Since smart builds only require users to upload and download what has changed since their last download, smart builds give AccelByte Developer Toolkit (ADT) users a way to quickly share their local changes with other people.
Compatibility
Smart Build currently supports these game specifications:
- Platform: Windows
- Unreal Engine versions: 4.26.2, 4.27.2, 5.0.2, 5.0.3, 5.1.0, 5.1.1, and 5.2
warning
You must use the same Unreal Engine version to compile the game and to upload it with the smart build feature. If the version doesn't match, the repackage will fail because it is undefined behavior from the CLI.
Set up a smart build
[Integrate the ADT SDK into your game].(/getting-started-guides/first-steps-integrate-blackbox-into-unreal-project/)
Open the ADT CLI, then create a new version with these commands.
.\BlackBoxCLI.exe version add --name <your version name> --namespace <your namespace> --apikey <your APIkey> --game-project <game project path> --base-url https://blackbox.accelbyte.ioAlternatively, you can set the intended version using this command:
.\BlackBoxCLI.exe version set --name <your version name> --namespace <your namespace> --apikey <your APIkey> --game-project <game project path> --base-url https://blackbox.accelbyte.ioRegister a new build with the
--smartbuildparameters..\BlackBoxCLI.exe build register --platform-name windows --platform-arch <platform-arch> --smartbuild --namespace <your namespace> --apikey <your apikey> --game-project <your project path> --base-url https://blackbox.accelbyte.ioYou can then change the build's name with the following command:
.\BlackBoxCLI.exe build add-metadata --key build-name --value <the new build name>note
You can only rename the build once through ADT CLI, but you can rename the build on ADT Web as many times as you need.
If the Unreal Editor is open, close it and relaunch the
.uproject. If the Unreal Editor is closed, launch the.uproject.Package the game and store it in a folder. For example,
C:\<upload_dir>.
Upload a smart build through the CLI
The following table contains the subcommands you can use when you upload the smart build.
| Main Command | Sub Command | Options and Parameters | |
|---|---|---|---|
| Name | Description | ||
| smartbuild | upload | --namespace | User namespace |
| --base-url | https://blackbox.accelbyte.io/ | ||
| --upload-dir | Directory of the binary that will be uploaded | ||
| --entry-point | Entry point/executable game name | ||
| --version-id | Set the desired version ID | ||
| --build-id | Set the desired build ID | ||
| --multipart-size | Desired multipart size in megabytes. Can't be less than 5. | ||
| --operation-id | Optional. ID number of diagnostic log. More info is available in the FAQ section below. | ||
| --temp-path | Optional. Folder path that will be used to store temporary files. More info is available in the FAQ section. | ||
| --launch-argument | Optional. Launch argument of the build |
The upload format log will show the following statuses:
Preprocessing package file
[SmartBuild] [info] YYYY-MM-DD HH:mm:ss: Writing 2000 chunks into folder: C:\Users\....\AppData\Local\Temp\....\Submitting manifest
[SmartBuild] [info] YYYY-MM-DD HH:mm:ss: Submitting initial manifest for build ID ce8c2221-45b3-4c74-97d2-1f805134ca8dUploading files
{"status":"uploading files","current":1500,"total":2000,"filename":"long filename","filesize": in bytes, "current_byte":in bytes ,"total_byte":in bytes, "rate": rate value, "time_remaining": approximate in seconds}
When the upload is complete, the CLI will show this log message:
Smartbuild upload took 600 seconds.
Build is successfully uploaded using smartbuild.
Download a smart build
Users can also use our build distribution app, the ADT Web, to download and play the binaries that have been uploaded using smart builds. Before running the download, users need to make sure the build is already uploaded using the smartbuild upload command.
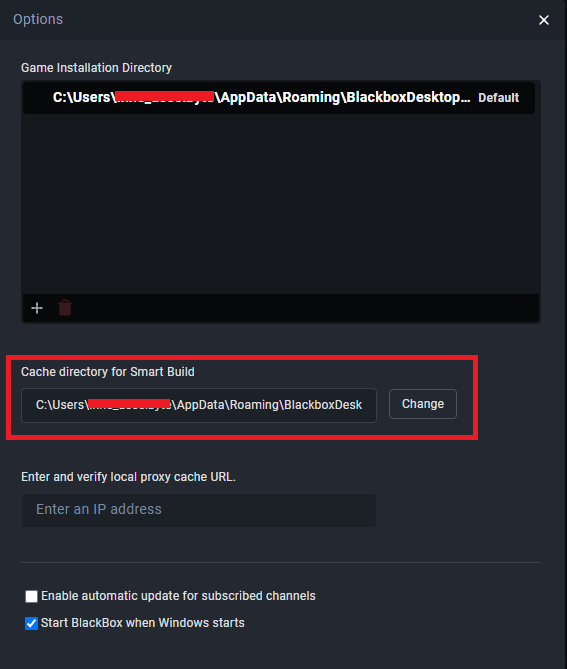
Configure a cache directory for smart build
Downloading binaries will require extra space to store the cache locally. After a user downloads a build using smart build, the cache will be stored and the size will be incrementally increased as much as the difference between the initial and updated binaries. Users need to set the cache folder to a location where there is plenty of storage space.
- Log in to ADT Web and click the settings icon in the header bar.

- To change the default cache directory for smart build, click the Change button and choose a folder.
- After you select the folder, you'll see a warning message. Click the Confirm button to proceed.
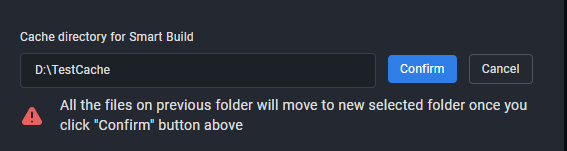
- Wait until you get confirmation that the process is done before you move on to the next step.

- When the moving process is finished, any downloaded build cache will be stored in the new folder.
info
The time required for the process depends on the size of the files inside the folder.
Download a smart build through the ADT Web Version pages
Log in to ADT Web.
Go to the Version menu.
Select the version from the list where you uploaded the smart build.
Click Download on the designated build.
After downloading the binaries, the button will change to Play and the build can be played.
Configure the build channel for smart build
Log in to ADT Web.
Go to build channel page.
Click the Add new build channel button.
Fill in the Build Channel name.
Select Smart Builds build type option in the New Build Channel pop-up page.
Select Windows from the Platform dropdown.
Select the correct changelist that contains the build uploaded with smart build.
Select the build to be set as Head.
Click the Add confirmation button.
The build channel will appear on the build channel list.
Download a smart build through the ADT Web Overview pages
Login to ADT Web.
On the Overview page, click Configure Build Channel.
The build channel you uploaded using smart build has an SB icon next to it. Select the build channel you want to subscribe to, and click Save Changes.
The subscribed build channels appear on the Overview page.
Click the Download button to start downloading the smart build.
info
When users download using smart build from ADT Web, the stage process will be included as one in the download process.
Additional features available on smart builds
Verify and Repair
When users download the build but the build can't be played, the ADT Web can check the designated build if it is broken or not by running the verify and repair.
Finish a download from ADT Web.
a. From Overview
b. From Version page
Go to ellipsis on the build channel and click Verify.
Button play will change to the verify progress bar.
Verify will result in two conditions.
a. No broken files, the button will go back to Play again.
b. There are broken files, the button will shown as Repair.
Before running the repair, keep the details of the broken files first.
a. Go to the ellipsis menu and select Open Folder.
b. Go to
<root installation folder>\.smartbuildand look forverify.json.c. Copy the file and keep it anywhere other than the installation folder. Later on, users can share the
verify.jsonfiles to the ADT team so we can use the information from the file to help us debug the issue.Click the Repair button to repair the build.
During the repair process, ADT Web will download the broken cache files or stage the missing files so the game can be played properly.
Once the Repair is finished, users should be able to play the game again.
Switch build
Switch build is an easy way to change the head of the build channel seamlessly. For a new build, users will need to update the head from the build channel pages first. However, if those build channels already has builds that have been set as head, users will be able to easily switch between builds on the overview page.
How to change the head of the build channel
Go to the build channel page.
Select Edit on the desired build channel.
Choose the desired changelist/version.
Select the desired build with (Build available) details from the selected version.
If the selected build is the same as the current Head, the Save button won't be clickable.
Click Save to finalize the change of build channel head.
Users will get notifications that the build channel is updated and the head value is changed on the build channels list.
How to use the switch build
Finish a Smart Build download from the Overview page.
The Switch Build button will be available on the right corner side of the build channel.
Click Switch Build. It will show a list of the builds that have been set as head (head of build history) in those build channels.
Users can look for specific build names from the head history by typing the build name in the search box.
Click on a build name other than the current build.
ADT Web will run a calculation process to show how much space the download needed for the targeted switch build. If users already have the cache available, the total size after update will be 0.
Click the Switch button to change the build channel Head.
ADT Web will instantly run the staging process.
The build channel head is changed and can be played.
Launch arguments
Add from CLI
Launch arguments can be added from the CLI while executing the smart build upload command by adding --launch-argument parameters.
Add from Version page
See Launch arguments to learn how to add launch arguments from the Version page.
Add from local launch argument
See Launch arguments to learn how to add launch arguments from Local launch arguments page.
Auto Update and Auto Play
See Auto update, deploy, and delay to learn more about this feature.
Current smart build limitations
Smart builds do not fully support Drag and Drop features.
FAQ
Q: Can we simultaneously download more than one build?
A: No, when you download a build, the system puts the next download in a queue. When the first download finishes or cancels, the next one starts.
Q: Can I change the cache directory during the download process?
A: No, it's better to change the cache directory before or after the download process. This prevents errors or a missing cache that would force the user to restart the download.
Q: When I get an error message, where can I find the log?
A: The log can be found in C:\Users\<Username>\.blackbox\diagnostic\<operation ID>. When a user does not specify the operation ID, CLI will generate it automatically.
Q: What is the usage of defining operation ID parameters before running a CLI command?
A: An Operation ID can be defined to keep the log of an upcoming CLI command process in a single folder.
Q: How can temp-path functionality speed up the process of preprocessing package files?
A: Currently, the process of repackaging the UCAS/PAK is heavily leaning on the memory and disk specifications. By default, CLI will use a folder in C:\Users\<Username>\AppData. Users can override the temporary folder location to a disk with plenty of space left so the repackaging process will be smoother.